
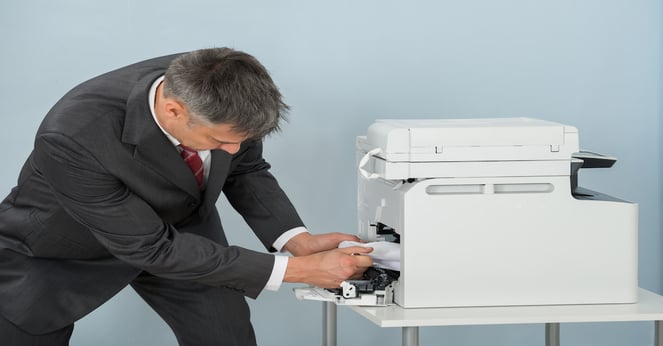
Clearing paper jams without breaking things
Paper jams remain the most frequent printer complaint, and they’re often surprisingly simple to resolve, though sometimes a bit fiddly. The causes are numerous, but they generally fall into a few categories: using the wrong type of paper, damaged paper with bent corners or tears, overloading the paper tray, or the presence of foreign objects like paper clips or dust inside the printer. Preventing jams is always preferable, but knowing how to clear them safely is essential.
Kill the power first. Unplug the cord so you don't get a shock or grind the gears while your hands are inside. Open the rear and front panels to find the snag. Pull the sheet slowly in the direction it was supposed to travel. If you rip it, those tiny scraps will just cause another jam five minutes later.
If the paper is stuck near the fuser (the hot part of the printer that melts toner onto the paper), exercise extreme caution. The fuser can be very hot. Allow it to cool down before attempting to remove the paper. Different printers have different jam locations. Check your printer’s manual for specific instructions. Common locations include the paper tray, inside the printer near the toner cartridge, and near the output area.
Never use excessive force. If the paper is stubbornly stuck, don't yank it. You could damage delicate components. Instead, try gently rocking the paper back and forth while pulling. As a preventative measure, store your paper in a dry, cool place to prevent it from becoming damp or warped. Using the correct paper type for your printer is also vital. Refer to your printer’s manual for recommendations. Regularly clean the paper tray to remove dust and debris.
- Turn off and unplug the printer.
- Open access panels.
- Gently pull the jammed paper.
- Avoid ripping the paper.
- Wait for the fuser to cool so you don't burn your fingers.
Fixing Wi-Fi and connection drops
Wi-Fi is the weakest link in home printing. Usually, the printer just dropped the signal or grabbed the wrong IP address. Before you start digging into driver settings, try the 'dumb' fixes first.
For Windows users, navigate to Settings > Devices > Printers & scanners. Select your printer and click 'Manage'. Choose 'Troubleshoot' to let Windows attempt to automatically diagnose and fix the problem. For macOS users, go to System Preferences > Printers & Scanners. Select your printer and click "Open Print Queue". If there are errors, macOS will often provide suggestions. Always restart both the printer and your router as a first step.
Verify that the printer is connected to the correct Wi-Fi network. Ensure the printer is within range of your router and that there are no obstructions interfering with the signal. Check the printer's display panel for Wi-Fi signal strength. If you’re using a network password, double-check that it’s entered correctly. IP address conflicts can occur when two devices on your network are assigned the same IP address. Restarting your router usually resolves this.
Consider a direct USB connection as a temporary workaround. If the printer works fine when connected via USB, the problem likely lies with the network connection. This can help you isolate the issue. Remember that Wi-Fi Direct offers a printer-to-device connection without needing a router, but this isn’t always a viable long-term solution.
- Restart printer and router.
- Check Wi-Fi signal strength.
- Verify network connection.
- Update printer drivers.
- Try a USB connection.
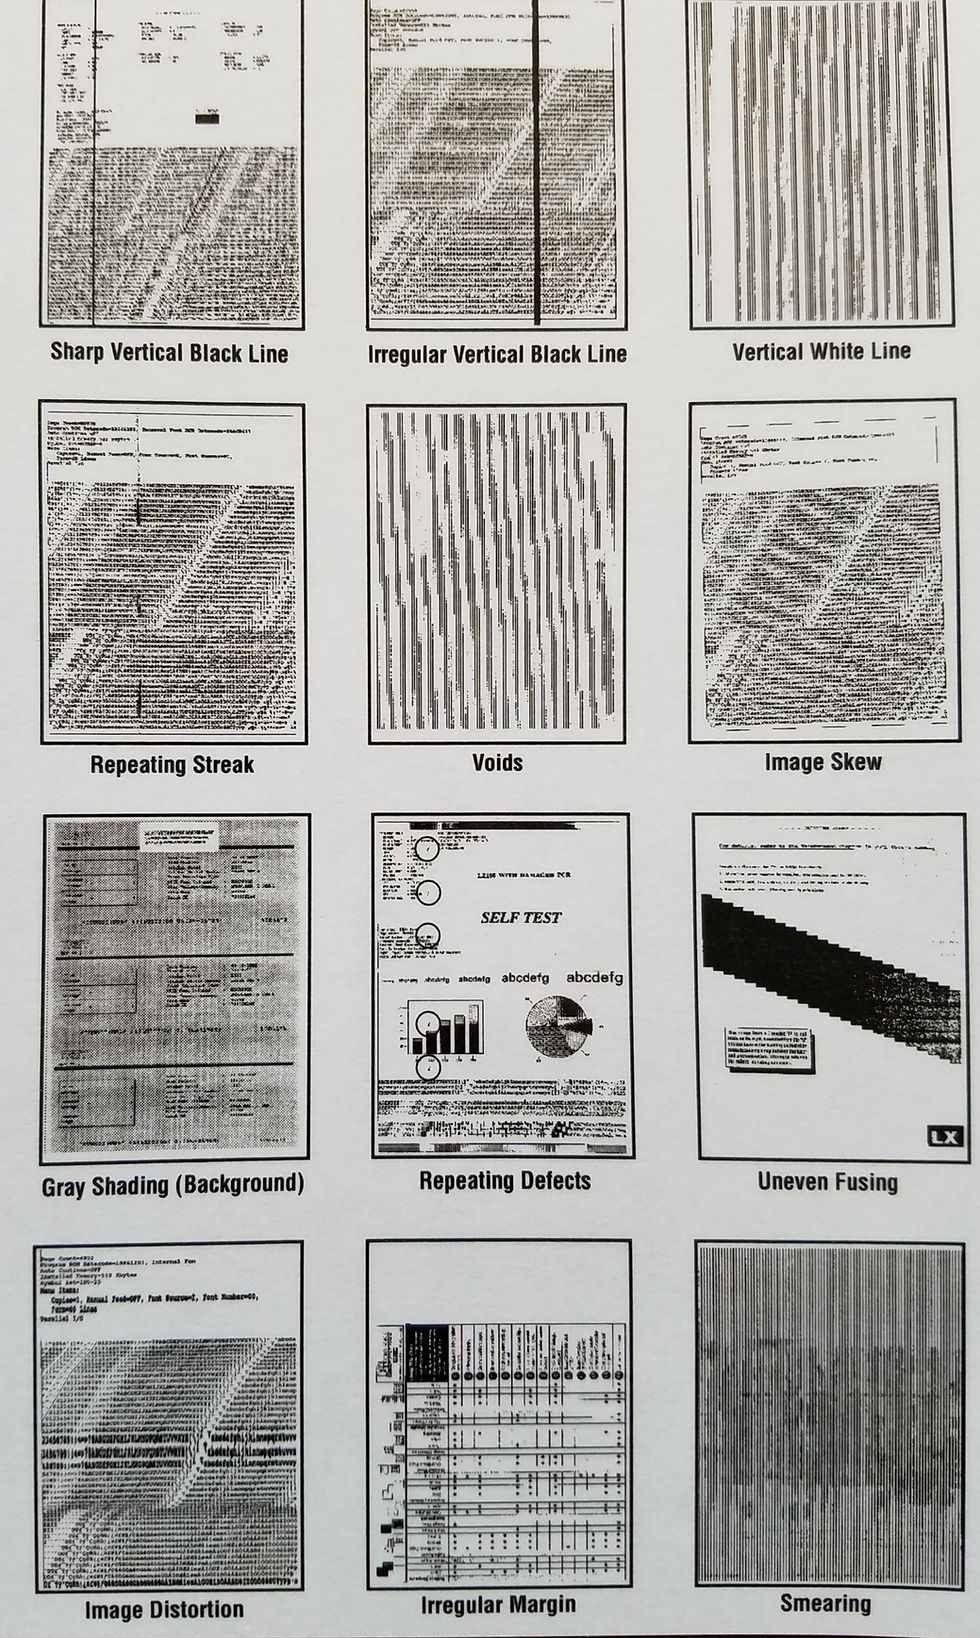
Print Quality Problems: Streaks, Fading, and Blurring
Poor print quality manifests in several ways – streaks, fading, blurring, or even completely blank pages. The causes vary depending on whether you’re using a laser or inkjet printer. Common culprits include low toner or ink levels, clogged print heads (inkjet printers), incorrect print settings, and damaged drums (laser printers).
For inkjet printers, running a cleaning cycle can often resolve print quality issues. This process uses ink to clear any blockages in the print heads. Consult your printer’s manual for instructions on how to initiate a cleaning cycle. Laser printers have a similar function for cleaning the drum unit. Adjusting print quality settings can also make a difference. Experiment with different settings to find the optimal balance between speed and quality.
It’s important to understand the difference between toner (used in laser printers) and ink (used in inkjet printers). Toner is a powder, while ink is a liquid. Toner generally produces sharper, more durable prints, while ink offers more vibrant colors. Using the correct paper type for the desired print quality is also crucial. For example, glossy paper is best for photos, while plain paper is suitable for everyday documents.
If streaks persist, inspect the toner cartridge or ink cartridge for damage. A damaged cartridge can cause uneven toner or ink distribution. If you suspect the drum unit is damaged (laser printer), it may need to be replaced. Regularly check toner and ink levels – running out mid-print can cause noticeable quality degradation.
Driver Dilemmas: Installation and Updates
Printer drivers are essential software components that allow your computer to communicate with your printer. Outdated or corrupted drivers can cause a wide range of problems, from printing errors to complete printer malfunction. Keeping your drivers up-to-date is crucial for optimal performance and compatibility. The best practice is to download drivers directly from the manufacturer’s website.
To download the latest drivers, visit the support section of your printer manufacturer’s website (e.g., HP, Epson, Canon). Search for your specific printer model and download the appropriate driver for your operating system (Windows or macOS). Follow the on-screen instructions to install the driver. During installation, you may be prompted to restart your computer.
Driver conflicts can occur when multiple printers are installed or when a previous driver installation is incomplete. Windows and macOS have built-in tools for managing drivers. In Windows, you can use Device Manager to uninstall conflicting drivers. In macOS, you can remove printers from System Preferences > Printers & Scanners. Roll back to a previous driver version if the latest driver causes issues. This can be done through Device Manager in Windows.
Avoid downloading drivers from unofficial sources. These drivers may contain malware or be incompatible with your printer. Always download drivers directly from the manufacturer’s website to ensure their authenticity and safety. Regularly check for driver updates, even if you’re not experiencing any problems. Manufacturers often release updates to fix bugs and improve performance.
Error Codes Decoded: What Do They Mean?
Printer error codes can seem cryptic, but they often provide valuable clues about the underlying problem. While error codes vary between printer models, some are relatively common. Understanding these codes can save you time and frustration. The manufacturer's website is the best resource for interpreting specific error codes for your printer.
Here's a table of some common error codes and their potential solutions. Please note that this is not exhaustive and specific solutions may vary. Error code 0x000006ba often indicates a problem with the print spooler service in Windows. Restarting the print spooler service can often resolve this issue. Error code 0x00000709 typically signifies a USB communication error. Try a different USB cable or port.
Other common errors include paper jams (often indicated by a specific code related to the paper path), toner/ink errors (indicating low levels or a cartridge problem), and hardware failures (which may require professional repair). Always refer to your printer’s manual for a complete list of error codes and their meanings. Support forums dedicated to your printer model can also be a valuable source of information.
Remember that error codes can sometimes be misleading. It’s important to consider the context of the error and try multiple troubleshooting steps. If you’re unable to resolve the issue, contact the printer manufacturer’s support team for assistance. They may be able to provide more specific guidance based on your printer model and the error code you’re encountering.
- Error Code: 0x000006ba – Solution: Restart print spooler service.
- Error Code: 0x00000709 – Solution: Try a different USB cable/port.
- Error Code: Paper Jam – Solution: Clear the paper jam (see previous section).
- Error Code: Toner/Ink Low – Solution: Replace toner/ink cartridge.
Preventative Maintenance: Keeping Your Printer Happy
Preventative maintenance is key to extending the life of your printer and minimizing downtime. Regular cleaning, proper paper handling, and using genuine supplies can significantly reduce the likelihood of problems. A little effort goes a long way in keeping your printer running smoothly.
Clean the exterior of your printer regularly with a soft, dry cloth. Dust and debris can accumulate and interfere with the printer’s operation. Clean the paper path to remove paper dust and debris. Refer to your printer’s manual for instructions on how to clean the paper path safely. Regularly check toner or ink levels and replace cartridges when necessary. Using low-quality or generic cartridges can damage your printer.
Always use the correct type of paper for your printer. Using the wrong type of paper can cause jams and damage the printer. Store paper in a dry, cool place to prevent it from becoming damp or warped. Avoid overloading the paper tray. Properly dispose of used toner or ink cartridges according to local regulations.
While a printer maintenance contract isn’t always necessary, it can be a worthwhile investment for businesses that rely heavily on printing. A maintenance contract typically includes regular maintenance visits, priority support, and discounted repair costs. Ultimately, a proactive approach to printer maintenance will save you time, money, and frustration in the long run.
Common Printer Issues & Troubleshooting - 2026 Guide
| Error Code | Description | Likely Cause | Troubleshooting Steps |
|---|---|---|---|
| 0x00000709 | Insufficient Disk Space | The printer's hard drive is full, preventing it from processing print jobs. | Delete unnecessary files from the printer's hard drive. If possible, increase the printer's storage capacity. |
| 0x0000007E | General Printing Error | A broad error indicating a problem with the printing process. | Restart the printer and the computer. Check the printer queue for stuck jobs. Ensure the correct printer driver is installed. |
| Paper Jam | Paper is stuck inside the printer. | Misaligned paper, damaged paper, or a problem with the paper feed mechanism. | Turn off the printer and carefully remove the jammed paper, following the printer's manual instructions. Check for small scraps of paper. |
| Low Toner/Ink | The toner or ink cartridge is running low. | The cartridge is nearing the end of its lifespan. | Replace the toner or ink cartridge with a new one. Check cartridge compatibility. |
| Printer Offline | The printer is not communicating with the computer. | Connection issues (USB, network), printer is turned off, or driver problems. | Check the power connection and network cable. Restart the printer and computer. Verify the printer is selected as the default printer. |
| 0x000006D9 | Print Spooler Error | A problem with the print spooler service on the computer. | Restart the Print Spooler service on your computer. (Windows: Services app). Clear the print queue. |
| Ghost Image | Faint, unwanted images appear on the printout. | Dirty drum unit or toner cartridge. | Clean or replace the drum unit or toner cartridge. Ensure the correct paper type is being used. |
| Streaking or Banding | Lines or bands appear on the printout. | Clogged printhead (inkjet) or faulty toner cartridge (laser). | Run the printer's cleaning cycle. Replace the printhead or toner cartridge if cleaning doesn't resolve the issue. |
Illustrative comparison based on the article research brief. Verify current pricing, limits, and product details in the official docs before relying on it.

No comments yet. Be the first to share your thoughts!